File Migration from One Salesforce Org to Another Org using Skyvia
File Migration
Exporting a file is a tough task. File export with its binary data is not supported in most of the available tools in the market. (eg: Dataloader, Dataloader.io, workbench).
However, we have the Skyvia web app, which does a really great job in file export and import.
We should pay attention to the following objects: ContentVersion(CV), ContentDocument (CD), ContentDocumentLink (CDL). I will use abbreviations for the above 3 objects further in this blog.
A combination of these 3 is used for storing files in Salesforce. We will ideally export only two of them — ContentVersion and ContentDocumentLink.
ContentVersion: stores binary data of a file. A file can have multiple versions, but a user only sees LatestContentVersion by default.
ContentDocument: there is always only 1 ContentDocument for a file. ContentDocument always contains LatestContentVersion id.
ContentDocumentLink: connects a record to the file with the help of ContentDocumentId and LinkedEntityId (parent record).
Usual File Migration needs quite a preparation. We have to divide it into parts:
- Identifying which files to be exported. To say, All Latest ContentVersion belongs to the Account object. ContentVersion allows query with filter only. Its not possible to filter by All ContentDocument Id in Skyvia. Skyvia doesn't support IN clause filter. So create a boolean or text field on ContentVersion. Will use this field later in document.
[Select Id, ContentDocumentId, LinkedEntityId from ContentDocumentLink where LinkedEntityId In (select id from Account) ]
Below is table for CDL for all account files.
Img 1 : Exported CDL
2. Do another export to retrieve all ContentVersion with ContentDocumentId fetched from the above query with Filter on IsLatest.

[Select Id, ContentDocumentId from ContentVersion where ConentDocumentIn IN ('0691L000003wFmAQAU','0691L000004bTcVQAU', '0691L000006AhlpQAC') and IsLatest]
Img 2. ContentVersion with New Field Update

3.Modify exported ContentVersion CSV file from step 2 . Have 1 new column of the newly created field. I gave the field name as 'DoMigrate' and assign the true value.
4. Update retrieved ContentVersion records with the above similar table data. This step will help when we export the files from Skyvia.
LET US MAKE OUR LIFE SIMPLER WITH SKYVIA?
Let us try Skyvia to save our time and efforts and automate file migration in seconds. With Skyvia, all the previous actions can be done in just a minute. Skyvia offers us a Query tool that can do all the preparation and modifications quickly and easily.
1. Let us follow these simple steps:Go to New >> Query >> SQL
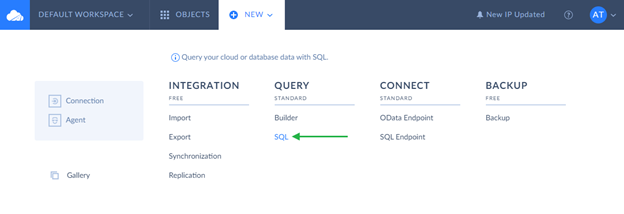
2. We select a Salesforce connection in the drop-down list on the left. All SFDC tables will be displayed below. Please note that here we use SQL, not SOQL. It will be a general SQL. You might need someone's help or if you are familiar with SQL, you will easily handle the task yourself by entering SQL statements in the code editor.
3. Below find an SQL query that will replace all 4 steps above in a single click.
UPDATE ContentVersion SET DoMigrate__c = TRUE
WHERE ContentDocumentId IN
(SELECT DISTINCT CDL.ContentDocumentID FROM
ContentDocumentLink CDL JOIN Account A ON CDL.LinkedEntityId = A.ID) AND IsLatest = TRUE
SQL Editor in Skyvia

Query Explanation looks like the following:
Update all retrieved ContentVersion with DoMigrate__c field set to True. Here ContentVersion was retrieved using ContentDocumentIds which we got from ContentDocumentLink. where CDL belongs to all Account records.
FILE EXPORT WITH SKYVIA
Let us assume you already have an account on Skyvia. First, you need to establish a connection with the Salesforce org from which you want to export the Files.
Follow the below steps to successfully establish the connection:
- Go to New >> Connection >> Search for Salesforce.
- In the opened Connection editor page, the default name of a new connection is Untitled. Click it to rename the connection, for example, to Salesforce1.
- Select Salesforce environment type to use.
- Select the OAuth method of authentication and click the Sign in with Salesforce button. This method allows you to avoid storing your Salesforce credentials in Skyvia. You authenticate directly to Salesforce.
- When the OAuth token is generated, click Create Connection.
 |
| Img3. Connection Setup |
Follow the below steps to configure an export package:
1. Go to New >> Click on Export.
- Select Source ( Salesforce connection created above).
- Select Target Type. Either download or storage online.
 |
| Img 4. Export View(RHS- Task creation, LHS - Connection Selection, export setup) |
2. Create a Task (right-hand side section on the page) by clicking on Add new (Img 4)
- Task Editor Opens up(Img 5)
- Select the ContentVersion object in the drop-down list.
- Select All columns or the required one per your choice. We will select VersionData at least as we are looking for a binary file.
- Click +Condition to add filter condition. In the first drop-down list, select ContentVersion, in the second drop-down list — DoMigrate field, in the third drop-down list — equals, in the fourth — True value. (because we can't use the IN clause, we created a boolean field and updated the ContentVersion records to export, setting this boolean field to true.)
- Click Save.
 |
| Img 5. Task Editor( Object, Field, filter selection) |
3. Finish a package creation
- Click on Validate (Img 6).
- Click on Create to create a package (you do it only once) and click Save (for any subsequent changes)(Img 6)
- Do check if the Running/Authorize user has "Query All Files" permission. Otherwise, you won't be able to export all files.
- All this setup does create a package(Img 6)
- Click on Run to start package execution (Img 6)
 |
| Img 6. Overall Export Package |
- Click on the Monitor tab to check the package execution results (Img 6)
- Under Run History(Img 7), click Run ID to open the History Details window and download the successfully exported files.
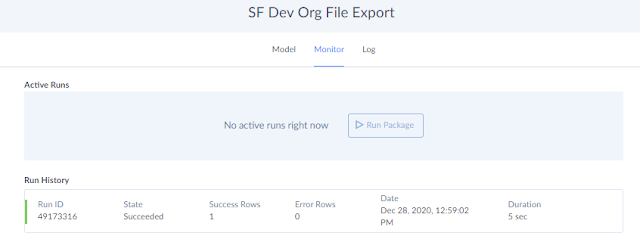 |
| Img 7. Monitor the Package Run |
PREPARATION OF FILE IMPORT TO SALESFORCE
After we have finished exporting a file in Skyvia, we need to update the exported CSV and do the import to target Salesforce org.
People generally do ContentVersion upload first, retrieve new CD ids, link old CD id to new CDId, then create ContentDocumentLink. Isn't this a clumsy process?
We will do a single upload which will create the ContentDocumentLink record as well.
On the exported CSV file, we will use FirstPublishLocationId and put the Parent record id of the file there.
It helps in linking the Parent record to the File and creates a copy of ContentDocumentLink as well.
If a File is associated with multiple records, it has multiple CDL records.
In that case, take 1 of parentId and use it as FirstPublishLocationId field for import. Once Import is done, create CDL records manually using csv for the rest of the records.
Hope this will help a lot of people who are stuck with the tedious task of File migration or export.
Thanks a lot to the Skyvia tool and team!!
It was impossible for us to do file migration without this tool.
A much-recommended tool to any organization/admin/developer/architect who stumbles upon such a requirement.
This is just icing on the cake. Skyvia has a lot to offer. It provides tools for different integration use cases, as well as other tools - for automatic scheduled backups, data management and mass cloud data updates/deletes from a web browser, etc.

I truly appreciate the time and work you put into sharing your knowledge. I found this topic to be quite effective and beneficial to me. Thank you very much for sharing. Continue to blog.
ReplyDeleteData Engineering Services
AI & ML Solutions
Data Analytics Services
Data Modernization Services
I truly appreciate the time and work you put into sharing your knowledge. I found this topic to be quite effective and beneficial to me. Thank you very much for sharing. Continue to blog.
ReplyDeleteData Engineering Solutions
Artificial Intelligence Solutions
Data Analytics Solutions
Data Modernization Solutions